HOME
Shopping Cart
Sterling Bracelets
Sterling Necklaces
Sterling Brooches
Sterling Buckles
Sterling Earrings
Sterling Rings
Traditional
Archery
Round Combs
Quilt Block Inlay
Turquoise & Silver
Folklore
Sterling Rings
Green Man Ring
Triple Moon Ring
Spider Ring
Custom Rune Ring
Eternal Life Rings
Pewter
Odin Figurine
Brigid's Cross
Porringers
Fairy Tales
Pet Jewelry
Seals & Signets
Special Treasures
Silver Dining Ware
Custom Cut Stones
Leather and Belts
Custom Design
Your Design
Gallery
Show Everything
Gold Work
Friends of the Forge
Measuring Ring Sizes
About Brigid's Forge
Links
Order
Email
All items handmade in the U.S.A.
Exhibiting Members of the
Craftsmen's Guild of Mississippi
You are visitor:

|  |

About Us |

Custom designer jewelry
by Robert and Debra Shinn
|

About Brigid's Forge
The Workshop
The Forge
Visit Us
Local Music
Natchez Trace
Nice Places
Family
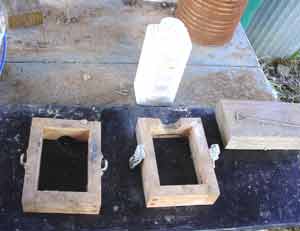
Sandcast Ankh
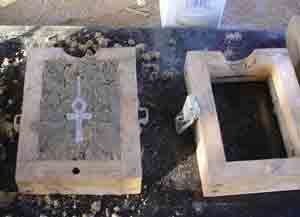
Step 1
Set up the flask.
The drag (left, inside face down) and cope (right, inside face up) of the flask
are set on a smooth, firm surface. These are made from
unpainted 1"x2" spruce wood aligned by a hardwood pin and fastened by
small draw catches. A deep groove has been routed along the interior
for the sand to grip.
|
|
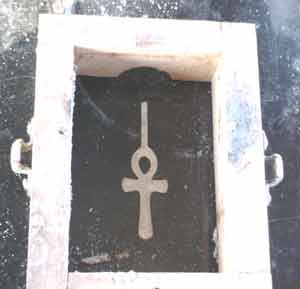
Step 2
Position the pattern.
The pattern, an ankh cut from a sheet of 1/8" Plexiglass acrylic, is placed with its
flat back on the smooth surface inside the drag.
|
|
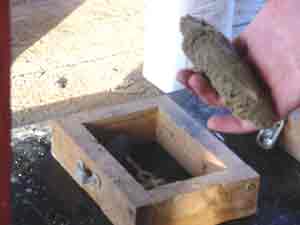
Step 3
Fill the drag with casting sand.
The casting sand for this job is made from 75%, by weight, fine sandblasting sand
and 25% bentonite driller's mud, with enough water added so that it will hold
its shape as shown. Crumble the sand and sift it over the pattern
until the drag is full. Go slowly and carefully until the pattern is covered;
filling the bulk of the drag may be done faster. Build it up into a small mound
over the drag, then press it down firmly with the heel of your hand.
|
|
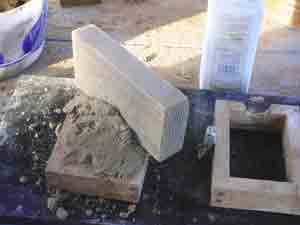
Step 4
Level the drag.
You should have some sand left above the level of the frame. Use a wood block
to press the sand down a little more, then scrape off all above the frame.
The top of the sand should be firm and without voids.
|
|
Step 5
Turn the drag over.
If the sand has been packed firmly enough, the sand should remain in place
after the drag is turned over. There should be no voids around the pattern.
If there are, you may fill them now with a tiny bit of sand smeared around the edge.
Make sure no sand is on the pattern's back!
|
|
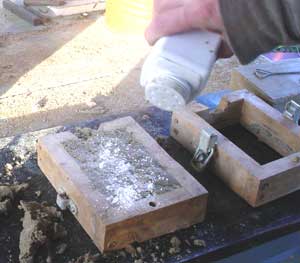
Step 6
Dust with parting powder.
The inner face of the sand-filled drag and the back of the pattern
must be covered with a dry parting powder. Generic baby powder
made from talc works fine. Around the pattern is the most important area as more
sand will be added next.
|
|
Next >>
Back to Workshop
Disclaimer: All techniques described are performered by professionals in a professional workshop.
These techniques work well for us; we do not warrant them for anyone else. We cannot be responsible for
anyone's property, profit, or safety. If you wish to make beautiful objects, pictures and
text are no substitute for a good class.
|